TERMS
- TIME SLOT – SPLITS DIGITAL SIGNAL INTO TWO EG TS-1 OR TS-2
- COLOR CODE – ASSIGNED NUMBER LIKE CTCSS TONE EG CC-1
- TALK GROUP – WORKDWIDE ASSIGNED UNIQUE NUMBER EG 311037
- CONTACT – USER ASSIGNED NAME FOR TG EG BRARA WITH TG-311037
- CHANNEL – USER ASSIGNED NAME OF FREQ, TS, TG, CC EG BAR-BRARA
- ZONE – USER ASSIGNED NAME LIST OF CHANNELS EG FAVORITES
What is a Code Plug
A Code Plug is nothing more than a fancy name for the software file that gets loaded into your radio to tell it what to do.
There are two stages to programming a DMR radio. The first stage is very similar to an analog radio. It determines the transmit and receive frequency of your repeater. The second part directs you through the network.
At first a code plug will seem a bit intimidating, but the object here is to make you comfortable with the various terms and the procedure to build one.
Before we start, let’s get familiar with a few of those terms and their definitions.
TDMA / Time Slots
TDMA stands for Time Division Multiple Access.
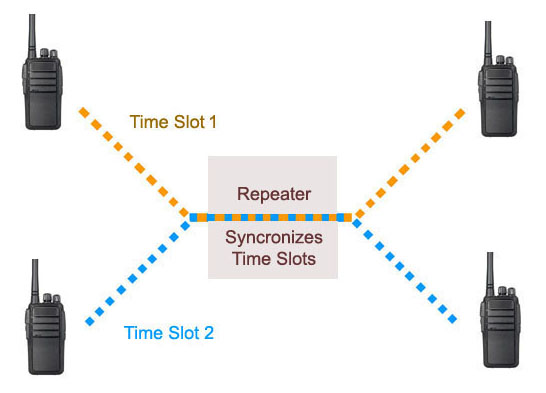
A standard FM handheld transmits a single carrier from the time you press the PTT to the time you release it. With the digital magic of TDMA, your signal is actually divided into alternating 30ms segments. This allows two signals to interweave, so two different conversations can take place on the same frequency at the same time.
The graphic below illustrates the splitting of a transmitted digital signal into these 30ms time slices. These are called Time Slots.
The code plug’s Time Slot (TS) parameter determines which path you will be using, TS1 or TS2.
 |
The code plug’s Time Slot (TS) parameter determines which path you will be using, TS1 or TS2.
 |
Color Code
The digital Color Code (CC) has nothing to do with a color. Compare it to a CTCSS or DCS code. Its function is to prevent interference between two repeaters with overlapping coverage. The proper CC is required for access and is assigned by the repeater’s owner. (normally, but not always CC1)
Talk Groups (TG) / Digital Contacts
There are well over a thousand different Talk Groups worldwide, each with its own assigned network ID. These TGs fall into various categories, such as States, Regions, Countries, Languages, etc. as well as general chat channels.
When you determine which TG’s you want to use, you would then add them to your Digital Contact list.
Channels
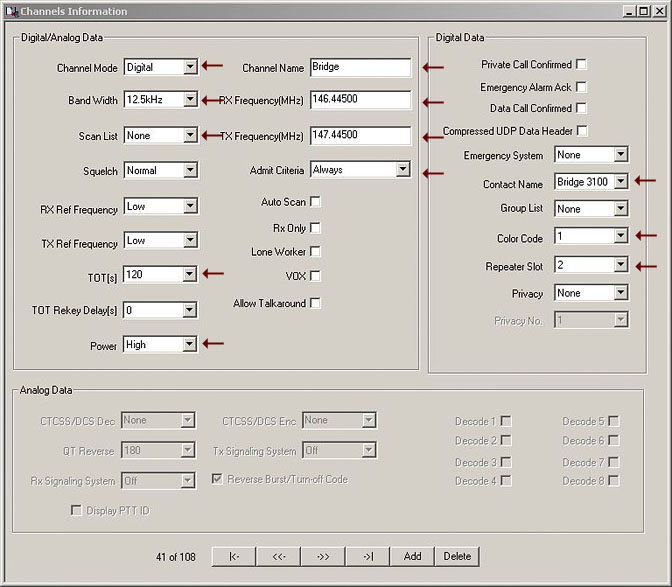
This is what ties everything for a specific channel together. Channel information contains information such as frequency, power, time out, TG, CC, etc. A further example is found below.
Zones
A Zone is the area in your radio where you group together related Channels. Some radios allow up to 16 channels per zone, others . You can set up the zones in groups such as:
– Your local repeater’s channels
– Simplex channels
– Most commonly used channels, etc.
Admit Criteria
This determines when you are allowed to transmit. The options are:
Color Code (preferred) – Allows you to transmit only when the time slot is available.
Channel Free – Allows you to transmit when the channel is clear, however there may be someone using the same time slot.
Always (impolite) – This allows you to transmit even if there is another QSO on a different time slot. This would interrupt the current QSO. The only time ‘Always’ should be used is if on a simplex channel or in the analog mode.
| Setting up a Code Plug |
Although code plugs are interchangeable between models, the basics are the same.
Step 1 – Transmit Talk Groups
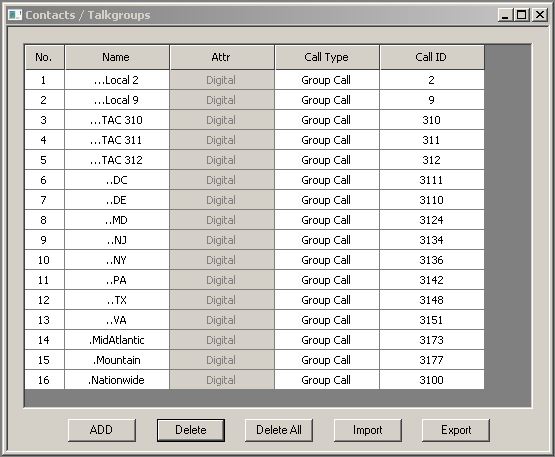
The first step is to identify the Talk Groups desired by Name and Groups ID.
The TG fields may be labeled differently, depending on your radio’s software, but they all serve the same purpose.
For example: Tx Contacts / Digital Contacts / Talk Groups
* When entering the TG ID, you are required to enter ‘Group Call’ or ‘Private’. Enter Group Call for all Talk Groups.
** You will also notice below that some software will sort the name column alphabetically. If it does, preceding the contact name with a period or comma will help categorize items by group names.
 |
To start, I would suggest the following TGs:
TG 9
Connects to your local repeater only
TG 2
Connects to your local repeater and those repeaters connected to the local network cluster. This could be upwards to a dozen or more repeaters across your state or region.
State Groups
Your state, and surrounding states. You do not need to be located in the state to use a state group, but it must be available in your repeater’s active TG list. It serves as a meeting place for those in your general area.
Nationwide 3100
This is a National Talk Group, sometimes referred to as a calling channel. Please use with courtesy. This TG links all repeaters nationwide. Although it is not a requirement for use, consider moving to a TAC channel or state TG for long conversations.
TAC channels
Secondary channels for long conversations or group chats. Common TAC channels are TG 310, 311, 312…
A sample of these and other TG’s as can be found at:
BrandMeister and DMR-MARC.
Parrot / Echo test – TG 9998, TS 2
This is a network echo test that allows you transmit up to 90 seconds, and after a 5 second pause, will repeat back to you exactly what the network users hear on their end. Excellent for audio level and distortion testing.
Note: On the Brandmeister network, the echo test is TG 9990, TS 2
Step 2 – Channel Information
This is where the control information is entered. The data required here is the Frequency, Power, Color Code, TG, and Time Slot where the desired TG can be found. The main items required are shown below.
* Pay special attention to the Time Slot. If the wrong time slot is selected, you are going nowhere. This can easily be overlooked.

– Channel Mode = Digital
– Band Width = 12.5 kHz
– Scan List = (save this option for later)
– Time Out Timer = 120 is a good starting point
– Power = Least amount needed to get into repeater
– Channel Name = Name that appears in your channel list
– Tx and Rx Frequency = Operating Frequency
– Admit Criteria = Color Code (repeater) or Always (simplex)
– Contact Name = This is the TG name
– Color Code = Determined by the repeater owner
– Repeater Slot = Determined by the repeater owner
Step 3 – Zone
After your Channels have been set up, you will need to place them into areas called Zones. The channels in a Zone can be arranged in any order. The same channel can appear in multiple zones.
So there you have it. Hopefully this has made you feel a little bit more comfortable about creating a code plug. A good recommendation would be to acquire a sample CP for your radio, examine it, and build upon it.

